Bring SpeakEasy to Your School
A screenshot-by-screenshot guide for ELD coaches and educators. No coding required. Set up a school-specific SpeakEasy practice site using the website ZIP and Cloudflare Pages.
speakeasy-[school].pages.dev
Replace [school] with a short school abbreviation. For example, Cameron uses speakeasy-cam.pages.dev. Cloudflare automatically generates the .pages.dev address; availability depends on the project name.
Download the SpeakEasy website files
Open the shared SpeakEasy folder in Google Drive. Find the latest website ZIP, right-click it, and choose Download. Save it to your computer and leave it zipped.
↗ Open the SpeakEasy Download FolderDistrict Google account required: Sign in with your Framingham Public Schools account. In the folder, right-click the ZIP and select Download (or select it and use the download icon).
Before you begin: Download the website ZIP above and sign in to your Cloudflare account. Keep the ZIP compressed—Cloudflare can accept it directly.
Open Workers & Pages
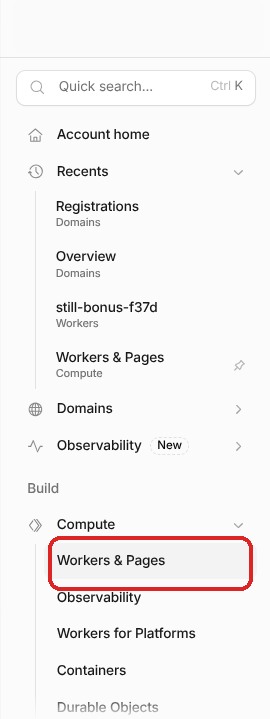
Sign in at dash.cloudflare.com. From the left sidebar, open Workers & Pages under Build → Compute.
Choose Create application
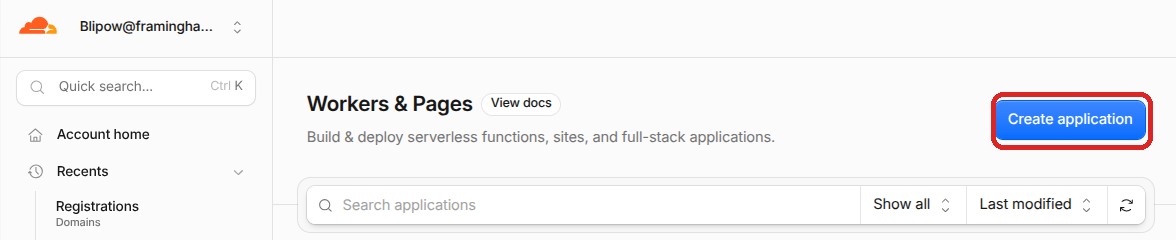
On the Workers & Pages dashboard, select the blue Create application button at the upper right.
Switch to Pages
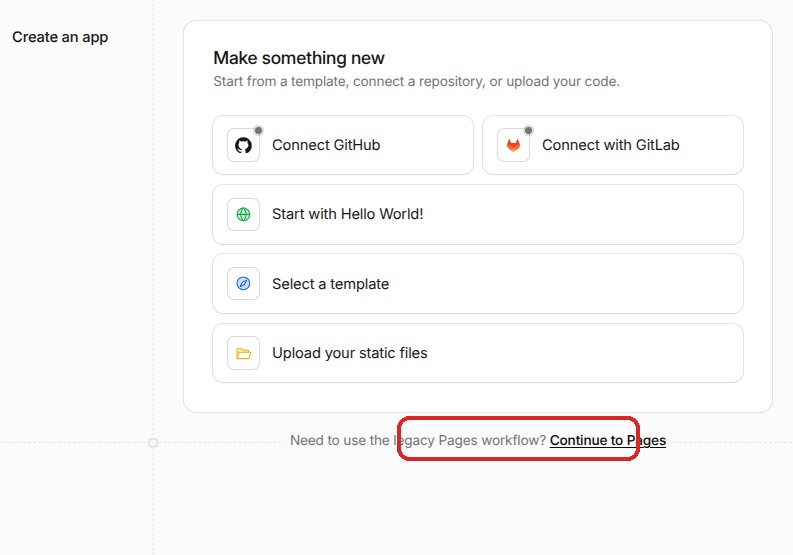
Cloudflare initially offers several ways to create an app. At the bottom, click Continue to Pages rather than the Workers upload option.
Choose Drag and drop your files
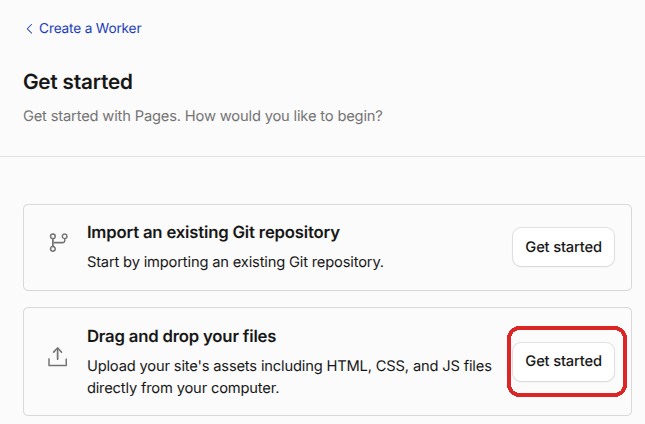
Under “Get started with Pages,” choose Drag and drop your files → Get started. You do not need GitHub or GitLab.
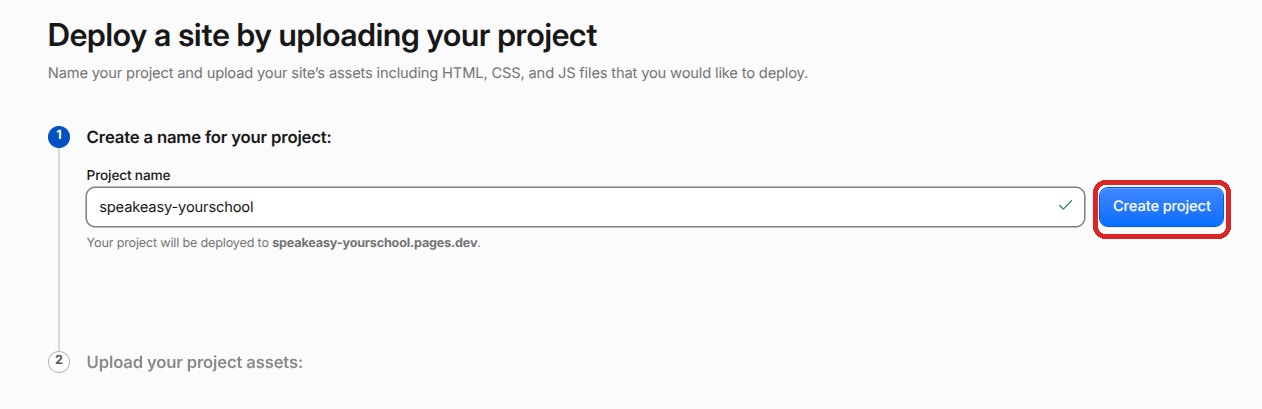
Name your school site
Enter speakeasy-[school], replacing the brackets and word “school” with your school’s short abbreviation. For example, speakeasy-cam. Click Create project. The chosen name must be available.
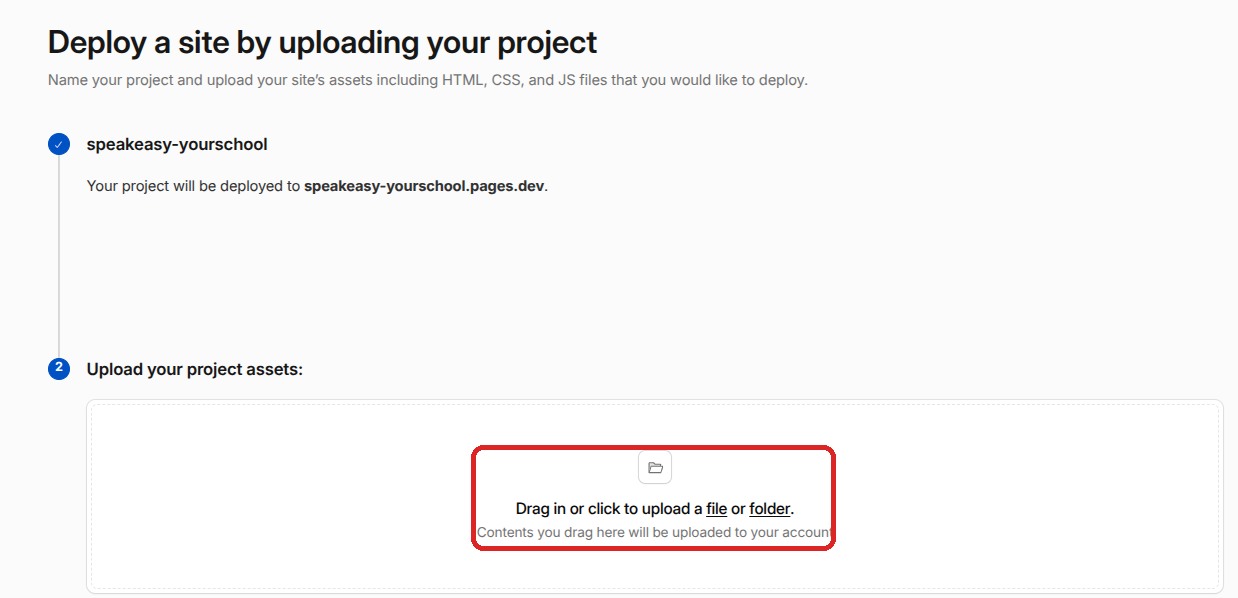
Upload the SpeakEasy ZIP
After creating the project, the upload box becomes active. Click the upload box or drag the SpeakEasy ZIP into it. Once Cloudflare finishes processing, select Deploy site on the next screen.
Confirm your site is live
When Cloudflare finishes deploying, you should see Success! and a link to your new website. Open the link to view your site. Choose Continue to project when you want to manage future deployments.

After deployment: test your site
Open the address displayed by Cloudflare, or visit https://speakeasy-[school].pages.dev using your chosen project name.
- Check the homepage and ELD 1, ELD 2, and ELD 3–4 activity libraries.
- Open an activity and verify each screen, image, and audio prompt.
- Test record → stop → play back → download on a Chromebook, with microphone access allowed.
- Once everything works, share your school URL with colleagues.
How to publish an update later
- Go to Workers & Pages, then open your existing school project.
- Open Deployments and choose Create deployment.
- Upload the revised ZIP, select Production, and deploy.
- Refresh the site and check one activity and the recording controls.
Important: You do not need to make another project to update the same school website. Keep a backup of the last working ZIP.
Common questions
I can't see “Continue to Pages.” Look near the bottom of the Create an app screen. Cloudflare's interface may change; follow its Pages Direct Upload instructions if needed.
The name isn't available. Try a different school abbreviation or add your district initials.
My ZIP uploaded, but I can't see the website. Confirm the deployment completed, open the generated address, and verify the ZIP has index.html at the top level.
Are student recordings stored on Cloudflare? This SpeakEasy version keeps recordings in the student's browser until they download them. Students can download their recordings and submit them through their usual classroom process.
Cloudflare documentation: Pages Direct Upload.
Cloudflare screenshots captured in November 2026; screen layouts may change over time.